In this tutorial I will highlight the advantages of having automatic
configuration of your ISA web proxy and firewall clients. In a rollout
of more than 50 clients this can prove as an incredible time saver
helping you to roll out as soon as a user logs into a machine that has
internet explorer already preinstalled.
When using ISA in a medium to large sized operation it is beneficial to
the business that minimal time is utilized rolling out clients. More
effort should be focused on the integrity of the ISA server and its
services. In these environments it can be extremely advantageous to
auto configure the ISA clients seamlessly. This strategy will not only
reduce helpdesk calls but also ensure that a standard is followed
throughout the organization, saving you time and money.
The auto discovery process
Firewall clients
1. A Winsock request is made and the client connects to the DNS/DHCP server.
2. The DNS/DHCP server has a Wpad entry pointing to a Wpad server (ISA Server computer).
3. Firewall client request is then quenched by the server that client is redirected to.
Web Proxy clients only IE5 and higher
1. A Web request is made the client connects to the DNS/DHCP server.
2. The DNS/DHCP server has a Wpad entry pointing to a Wpad server (ISA Server computer).
3. Web proxy client request is then quenched by the server that client is redirected to.
DHCP automatic discovery configuration
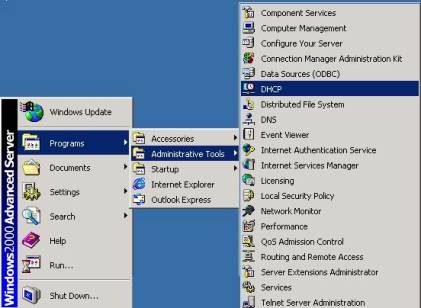
1. On the server that has DHCP running on it and click the DHCP manager.
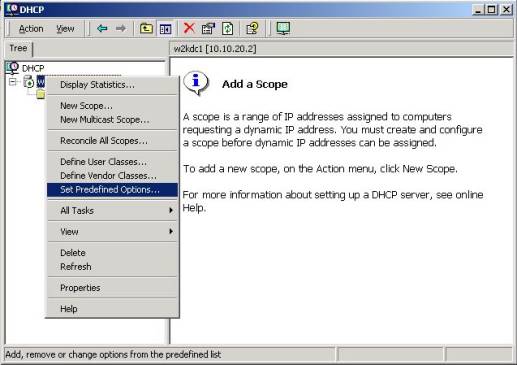
2. In the DHCP MMC right-click the respective DHCP server, then select and click Set Predefined Options.
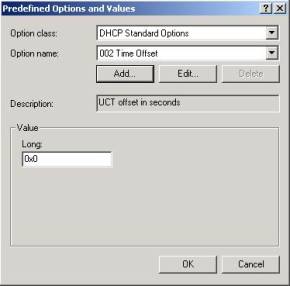
3. Now click add. This screen reflects where you will be
able to configure new DHCP options that will give a new angle in
dynamically assigning IP addresses of respective servers that that are
in fact running ISA server.
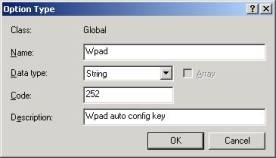
4. In the Name field type Wpad, in the data type drop down box you must select string then in the code field type in 252 and give the option type a descriptive name. Now click ok. Then click Ok again.
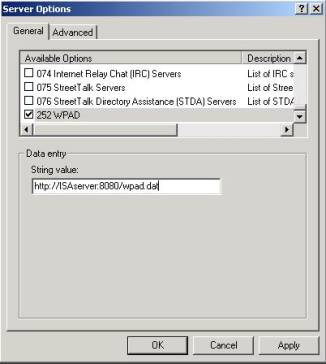
5. You should now be presented with this window. In the general tab
under the available options box scroll to WPAD and select it. In the
String value you should type in http://the name of the ISA server: the Auto Discovery PortNumber/Wpad.dat. A typical string will look like this: Http://ISA.network.com:80/wpad.dat
6. Right-click Server options and then click configure options to confirm your settings.
Configuring DNS for auto discovery of ISA
This part of the article assumes that you have
already configured your DNS server to at least have a forward lookup
zone, and that you have access to the server that has DNS installed on
it.
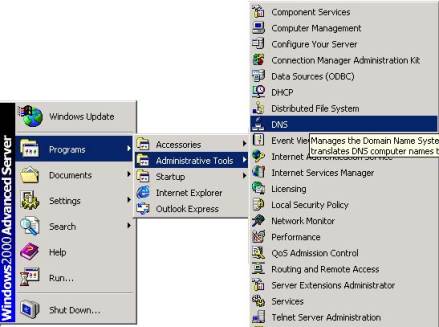
1. Click on the DNS icon to open the DNS MMC on the windows 2000 server that has DNS installed on it.

2. Right click on the respective forward lookup zone.
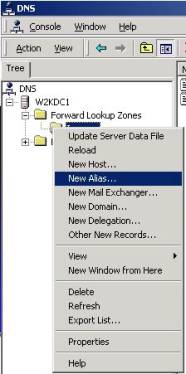
3. Now click New Alias.
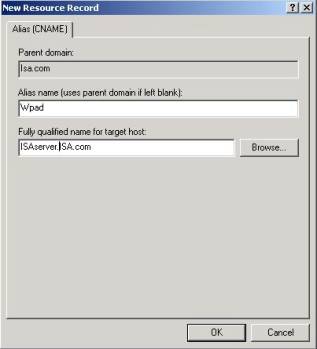
4. In Alias name, type Wpad and then in the fully qualified name for
target host text field type in the FQDN of the ISA server. Then click
ok.
You have now successfully configured two methods of contacting the
ISA server. Please note that the client also needs to be enabled for
auto configuration, to enable it to auto detect the settings that it
needs to contact the respective ISA server.


